Facilitator guide
Case objectives, demonstration plans, debriefs, common mistakes and application checks across all 81 workplace cases and method lessons.
Download Facilitator guide PDF · 166 pages · 65.1 MB OPEXSTUDIO
Understand how the methods relate before selecting a detailed lesson.. Follow the visual, practise a decision, then check your thinking.
Fictional teaching examples and AI-generated illustrations. Proposed changes and goals are not achieved results. Use the written instructions and check local conditions before applying a method.
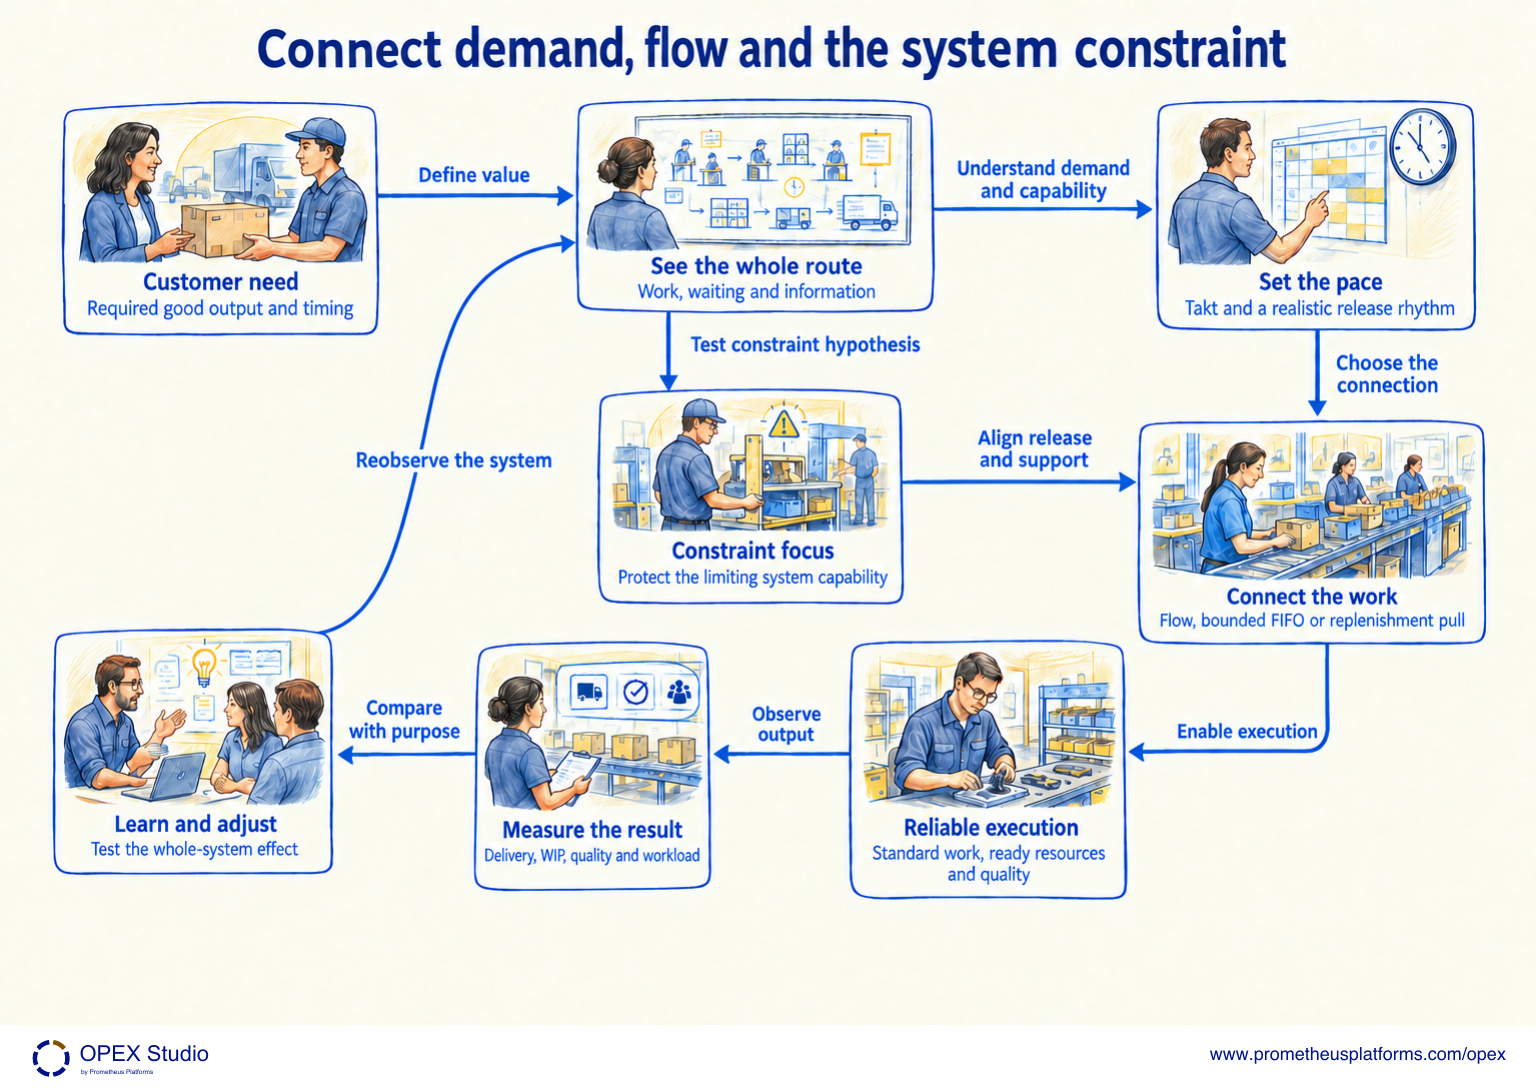
Begin with required good output and the route that delivers it. A fast local step can still create waiting or excess WIP elsewhere. Relate demand to available working time, then choose how adjacent processes connect. Reliable methods and quality support this connection. In parallel, test what limits the system goal; a large queue alone does not prove the constraint. Align release and supporting work to that evidence. Check delivery, quality, WIP and workload together before expanding a change. Lean flow questions and TOC constraint questions can support the same investigation while retaining their distinct controls.
Takt is a demand reference; it is not a measured cycle time.
Flow, FIFO and supermarket pull require different operating conditions.
The constraint hypothesis requires route and operating-state evidence, not queue size alone.
A team proposes speeding an upstream step while downstream work waits for missing information. Where does the map send the team first?
Observe the complete route and the cause of downstream waiting. Test the constraint hypothesis and information readiness before assuming that upstream speed will improve delivery.
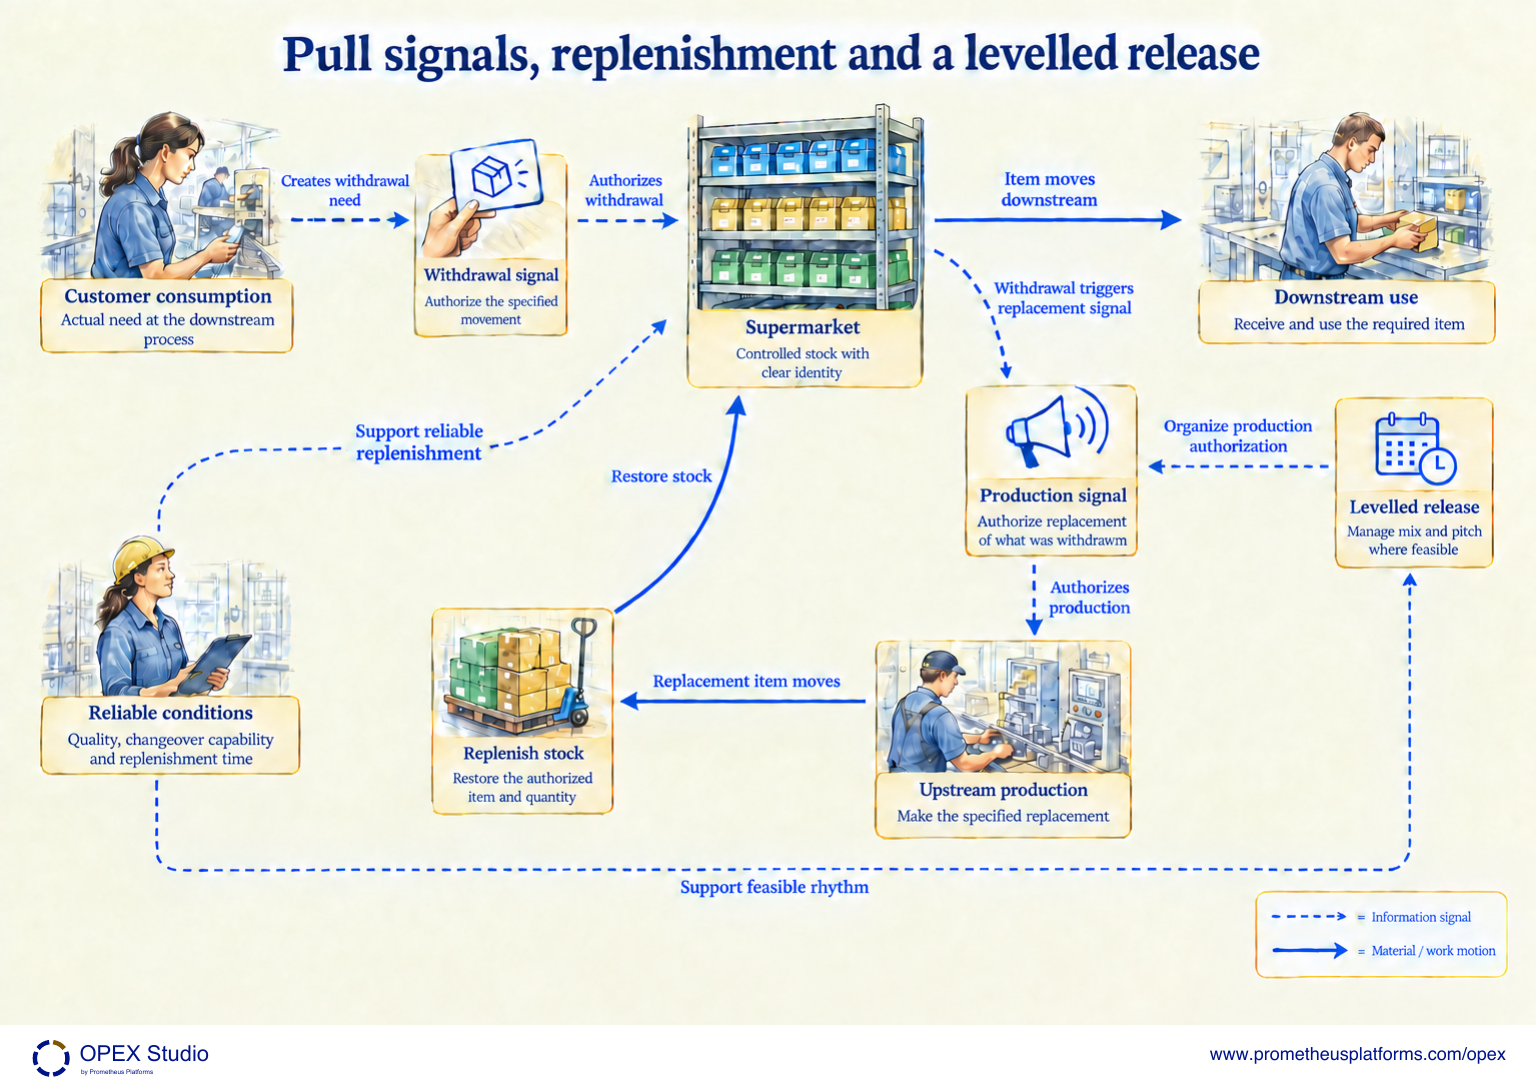
Two kanban signals authorize different actions. A withdrawal signal permits movement of the specified item; a production signal permits its replacement. Keep the physical item route visually separate from the information route. Replenishment stock and signal quantities depend on actual demand, replenishment time, variation and policy; this overview prescribes no count. A levelled production release can organize mix and pitch where the process has the necessary capability. It does not mean every arriving order is produced immediately or that changeovers disappear. Quality at source, reliable replenishment and safe changeover improvement make smaller controlled releases more practical. Investigate missing or late signals rather than silently producing extra stock.
Withdrawal authorizes movement; production kanban authorizes replacement production.
Pitch combines takt with a chosen pack quantity; a levelled mix requires feasibility checks.
Stock and signal quantities need local evidence; the drawing prescribes no universal number.
A downstream team needs material and sends a withdrawal signal. Does that signal alone authorize an upstream operator to produce any convenient batch?
No. The withdrawal signal authorizes the specified movement. Upstream production follows the appropriate production authorization, identity and quantity. Investigate a missing signal instead of substituting an unapproved batch.
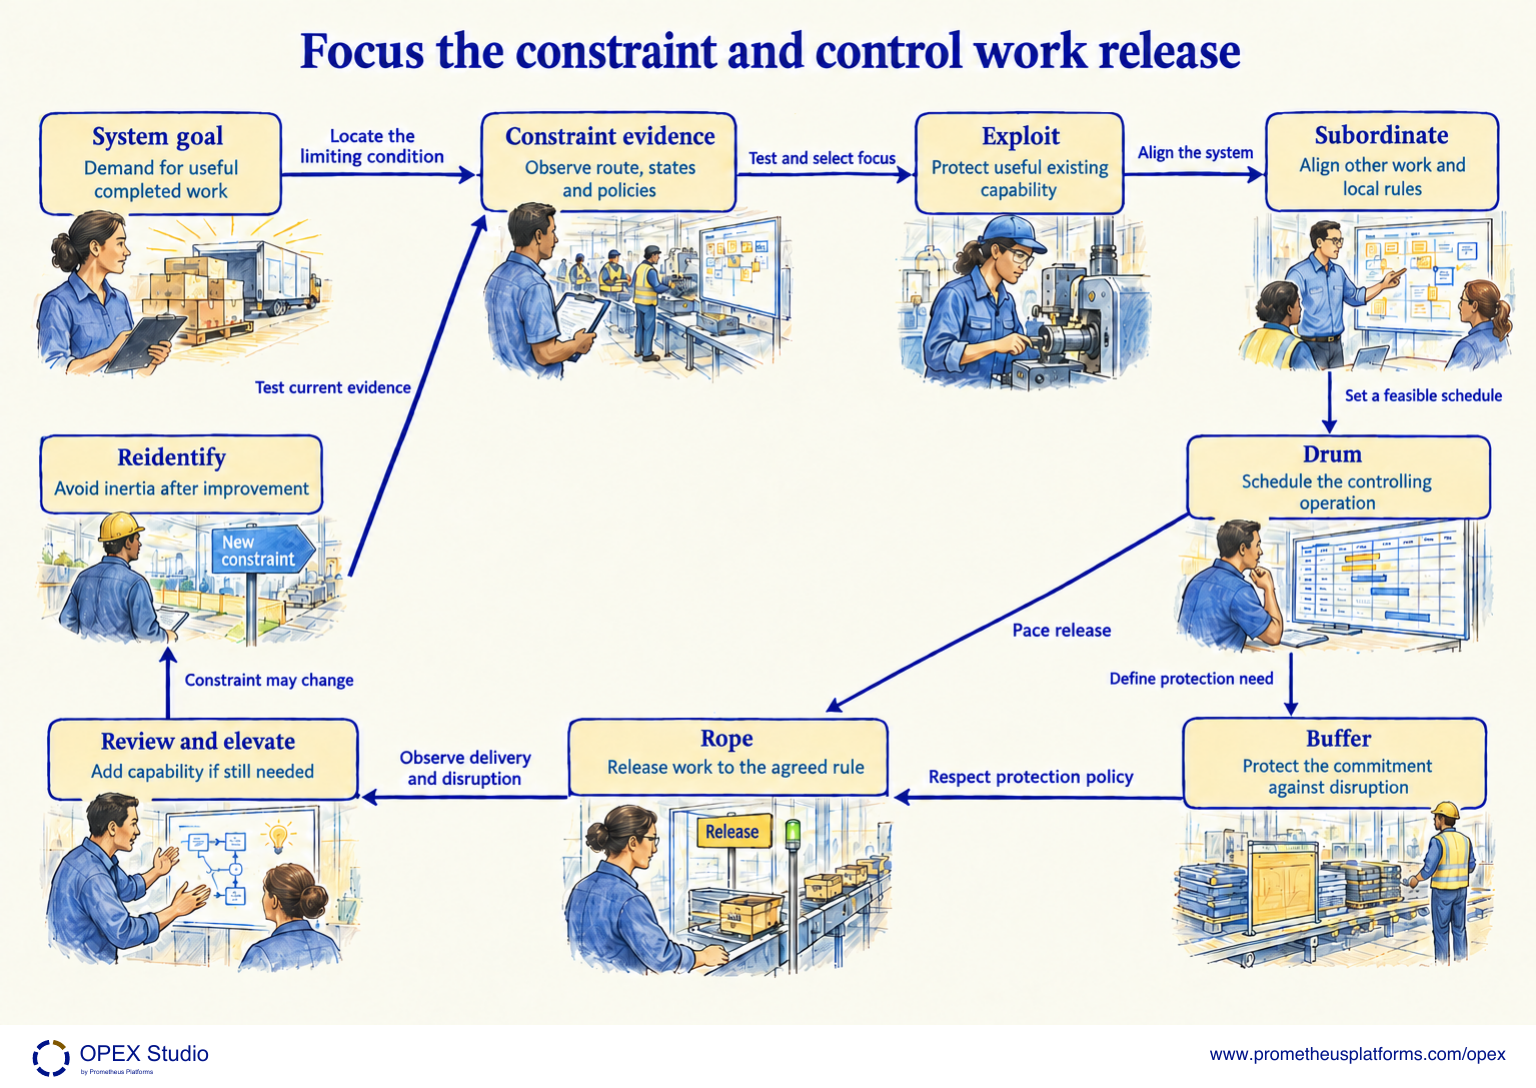
Begin with the system goal and test what limits it. Protect useful existing capacity before assuming that investment is the first answer. Align upstream release, supporting work and local rules with that decision. In a drum-buffer-rope design, the drum provides the controlling schedule, the buffer protects a commitment and the rope controls release. Buffers do not justify arbitrary excess WIP or unsafe acceleration. Review actual disruption and delivery evidence to improve reliability. If further capacity remains necessary, evaluate elevation with the whole-system effect in view. Reidentify the current constraint after change; the previously slowest operation may no longer deserve the same priority.
DBR elements serve distinct functions: schedule, protection and release.
Buffer response requires a declared local policy; no universal color thresholds are supplied.
Exploitation and subordination may change the constraint before investment is needed.
An upstream machine is idle while the controlling operation is fully supplied. A supervisor wants to release more work to improve local utilization. What should be checked?
Check the drum schedule, authorized release rule, buffer condition and actual system demand. Extra upstream work may add WIP without improving delivery. Local utilization alone does not establish a valid release.
TPS purpose, people, jidoka and synchronized Just-in-Time
Method reference; original OPEX scenario and diagram are synthetic teaching content, not source case results.FIFO work release and bounded queues in service workflows
Method reference; original OPEX scenario and diagram are synthetic teaching content, not source case results.Predetermined stock locations and consumption-triggered replenishment
Method reference; original OPEX scenario and diagram are synthetic teaching content, not source case results.Demand-paced time; page retrieved initially, subsequent request timed out
Method reference; original OPEX scenario and diagram are synthetic teaching content, not source case results.Define system goal/metrics, constraints and rules before intervention; public synopsis only
Public course synopsis only; no claim to have viewed restricted course content.Five focusing steps connect applications and complement other improvement approaches; public synopsis only
Public course synopsis only; no claim to have viewed restricted course content.Production and withdrawal signals authorize different actions
Method reference; original OPEX scenario and diagram are synthetic teaching content, not source case results.Mix/volume leveling, pitch = takt × pack quantity
Method reference; original OPEX scenario and diagram are synthetic teaching content, not source case results.Separate internal/external setup then convert and improve
Method reference; original OPEX scenario and diagram are synthetic teaching content, not source case results.Identify, exploit, subordinate, elevate, repeat without inertia
Method reference; original OPEX scenario and diagram are synthetic teaching content, not source case results.Constraint schedule, protection and release control; English synthesis from Japanese primary text
Method reference; original OPEX scenario and diagram are synthetic teaching content, not source case results.Buffer management and recurring red-zone instability; indexed conference text
Method reference; original OPEX scenario and diagram are synthetic teaching content, not source case results.Read the lessons online or use these PDFs to prepare, practise and review with your team. No sign-in needed.
Case objectives, demonstration plans, debriefs, common mistakes and application checks across all 81 workplace cases and method lessons.
Download Facilitator guide PDF · 166 pages · 65.1 MBPrintable case worksheets, blank observation records and five calculation exercises; answers are separate.
Download Learner workbook PDF · 169 pages · 10.7 MBReasoned sample responses, worked calculations and coaching guidance; fictional examples are clearly labelled.
Download Answer key and coaching notes PDF · 105 pages · 8.5 MBThe native method mechanisms and worked applications for all 68 detailed lessons, in a separate bookmarked portrait reference.
Download Method and application reference PDF · 141 pages · 10.2 MBFive illustrated system chapters: 15 Flare concept maps and 26 original workplace teaching cards, with links to all 81 supporting cases and method lessons.
Download Illustrated systems atlas PDF · 69 pages · 55.8 MBPrimary teaching mechanism belongs to lean flow and system performance. Supporting links identify application dependencies; they do not make the methods interchangeable.
Explore the connected method →Primary teaching mechanism belongs to lean flow and system performance. Supporting links identify application dependencies; they do not make the methods interchangeable.
Explore the connected method →Primary teaching mechanism belongs to lean flow and system performance. Supporting links identify application dependencies; they do not make the methods interchangeable.
Explore the connected method →Primary teaching mechanism belongs to lean flow and system performance. Supporting links identify application dependencies; they do not make the methods interchangeable.
Explore the connected method →Primary teaching mechanism belongs to lean flow and system performance. Supporting links identify application dependencies; they do not make the methods interchangeable.
Explore the connected method →Primary teaching mechanism belongs to lean flow and system performance. Supporting links identify application dependencies; they do not make the methods interchangeable.
Explore the connected method →Primary teaching mechanism belongs to lean flow and system performance. Supporting links identify application dependencies; they do not make the methods interchangeable.
Explore the connected method →Primary teaching mechanism belongs to lean flow and system performance. Supporting links identify application dependencies; they do not make the methods interchangeable.
Explore the connected method →Primary teaching mechanism belongs to lean flow and system performance. Supporting links identify application dependencies; they do not make the methods interchangeable.
Explore the connected method →Primary teaching mechanism belongs to lean flow and system performance. Supporting links identify application dependencies; they do not make the methods interchangeable.
Explore the connected method →Primary teaching mechanism belongs to lean flow and system performance. Supporting links identify application dependencies; they do not make the methods interchangeable.
Explore the connected method →Primary teaching mechanism belongs to lean flow and system performance. Supporting links identify application dependencies; they do not make the methods interchangeable.
Explore the connected method →Primary teaching mechanism belongs to lean flow and system performance. Supporting links identify application dependencies; they do not make the methods interchangeable.
Explore the connected method →Primary teaching mechanism belongs to lean flow and system performance. Supporting links identify application dependencies; they do not make the methods interchangeable.
Explore the connected method →Primary teaching mechanism belongs to lean flow and system performance. Supporting links identify application dependencies; they do not make the methods interchangeable.
Explore the connected method →Primary teaching mechanism belongs to lean flow and system performance. Supporting links identify application dependencies; they do not make the methods interchangeable.
Explore the connected method →Primary teaching mechanism belongs to lean flow and system performance. Supporting links identify application dependencies; they do not make the methods interchangeable.
Explore the connected method →Primary teaching mechanism belongs to lean flow and system performance. Supporting links identify application dependencies; they do not make the methods interchangeable.
Explore the connected method →Primary teaching mechanism belongs to lean flow and system performance. Supporting links identify application dependencies; they do not make the methods interchangeable.
Explore the connected method →Primary teaching mechanism belongs to lean flow and system performance. Supporting links identify application dependencies; they do not make the methods interchangeable.
Explore the connected method →Primary teaching mechanism belongs to lean flow and system performance. Supporting links identify application dependencies; they do not make the methods interchangeable.
Explore the connected method →Primary teaching mechanism belongs to lean flow and system performance. Supporting links identify application dependencies; they do not make the methods interchangeable.
Explore the connected method →Primary teaching mechanism belongs to lean flow and system performance. Supporting links identify application dependencies; they do not make the methods interchangeable.
Explore the connected method →Primary teaching mechanism belongs to lean flow and system performance. Supporting links identify application dependencies; they do not make the methods interchangeable.
Explore the connected method →Primary teaching mechanism belongs to lean flow and system performance. Supporting links identify application dependencies; they do not make the methods interchangeable.
Explore the connected method →Primary teaching mechanism belongs to quality control and dependable evidence. Supporting links identify application dependencies; they do not make the methods interchangeable.
Explore the connected method →Primary teaching mechanism belongs to quality control and dependable evidence. Supporting links identify application dependencies; they do not make the methods interchangeable.
Explore the connected method →Primary teaching mechanism belongs to leadership and daily learning. Supporting links identify application dependencies; they do not make the methods interchangeable.
Explore the connected method →Primary teaching mechanism belongs to equipment wellness and oee. Supporting links identify application dependencies; they do not make the methods interchangeable.
Explore the connected method →Primary teaching mechanism belongs to equipment wellness and oee. Supporting links identify application dependencies; they do not make the methods interchangeable.
Explore the connected method →Primary teaching mechanism belongs to equipment wellness and oee. Supporting links identify application dependencies; they do not make the methods interchangeable.
Explore the connected method →Primary teaching mechanism belongs to equipment wellness and oee. Supporting links identify application dependencies; they do not make the methods interchangeable.
Explore the connected method →Primary teaching mechanism belongs to equipment wellness and oee. Supporting links identify application dependencies; they do not make the methods interchangeable.
Explore the connected method →Primary teaching mechanism belongs to equipment wellness and oee. Supporting links identify application dependencies; they do not make the methods interchangeable.
Explore the connected method →Primary teaching mechanism belongs to equipment wellness and oee. Supporting links identify application dependencies; they do not make the methods interchangeable.
Explore the connected method →Primary teaching mechanism belongs to equipment wellness and oee. Supporting links identify application dependencies; they do not make the methods interchangeable.
Explore the connected method →