Facilitator guide
Case objectives, demonstration plans, debriefs, common mistakes and application checks across all 81 workplace cases and method lessons.
Download Facilitator guide PDF · 166 pages · 65.1 MB OPEXSTUDIO
Define failure mechanism. Follow the visual, practise a decision, then check your thinking.
Fictional teaching examples and AI-generated illustrations. Proposed changes and goals are not achieved results. Use the written instructions and check local conditions before applying a method.
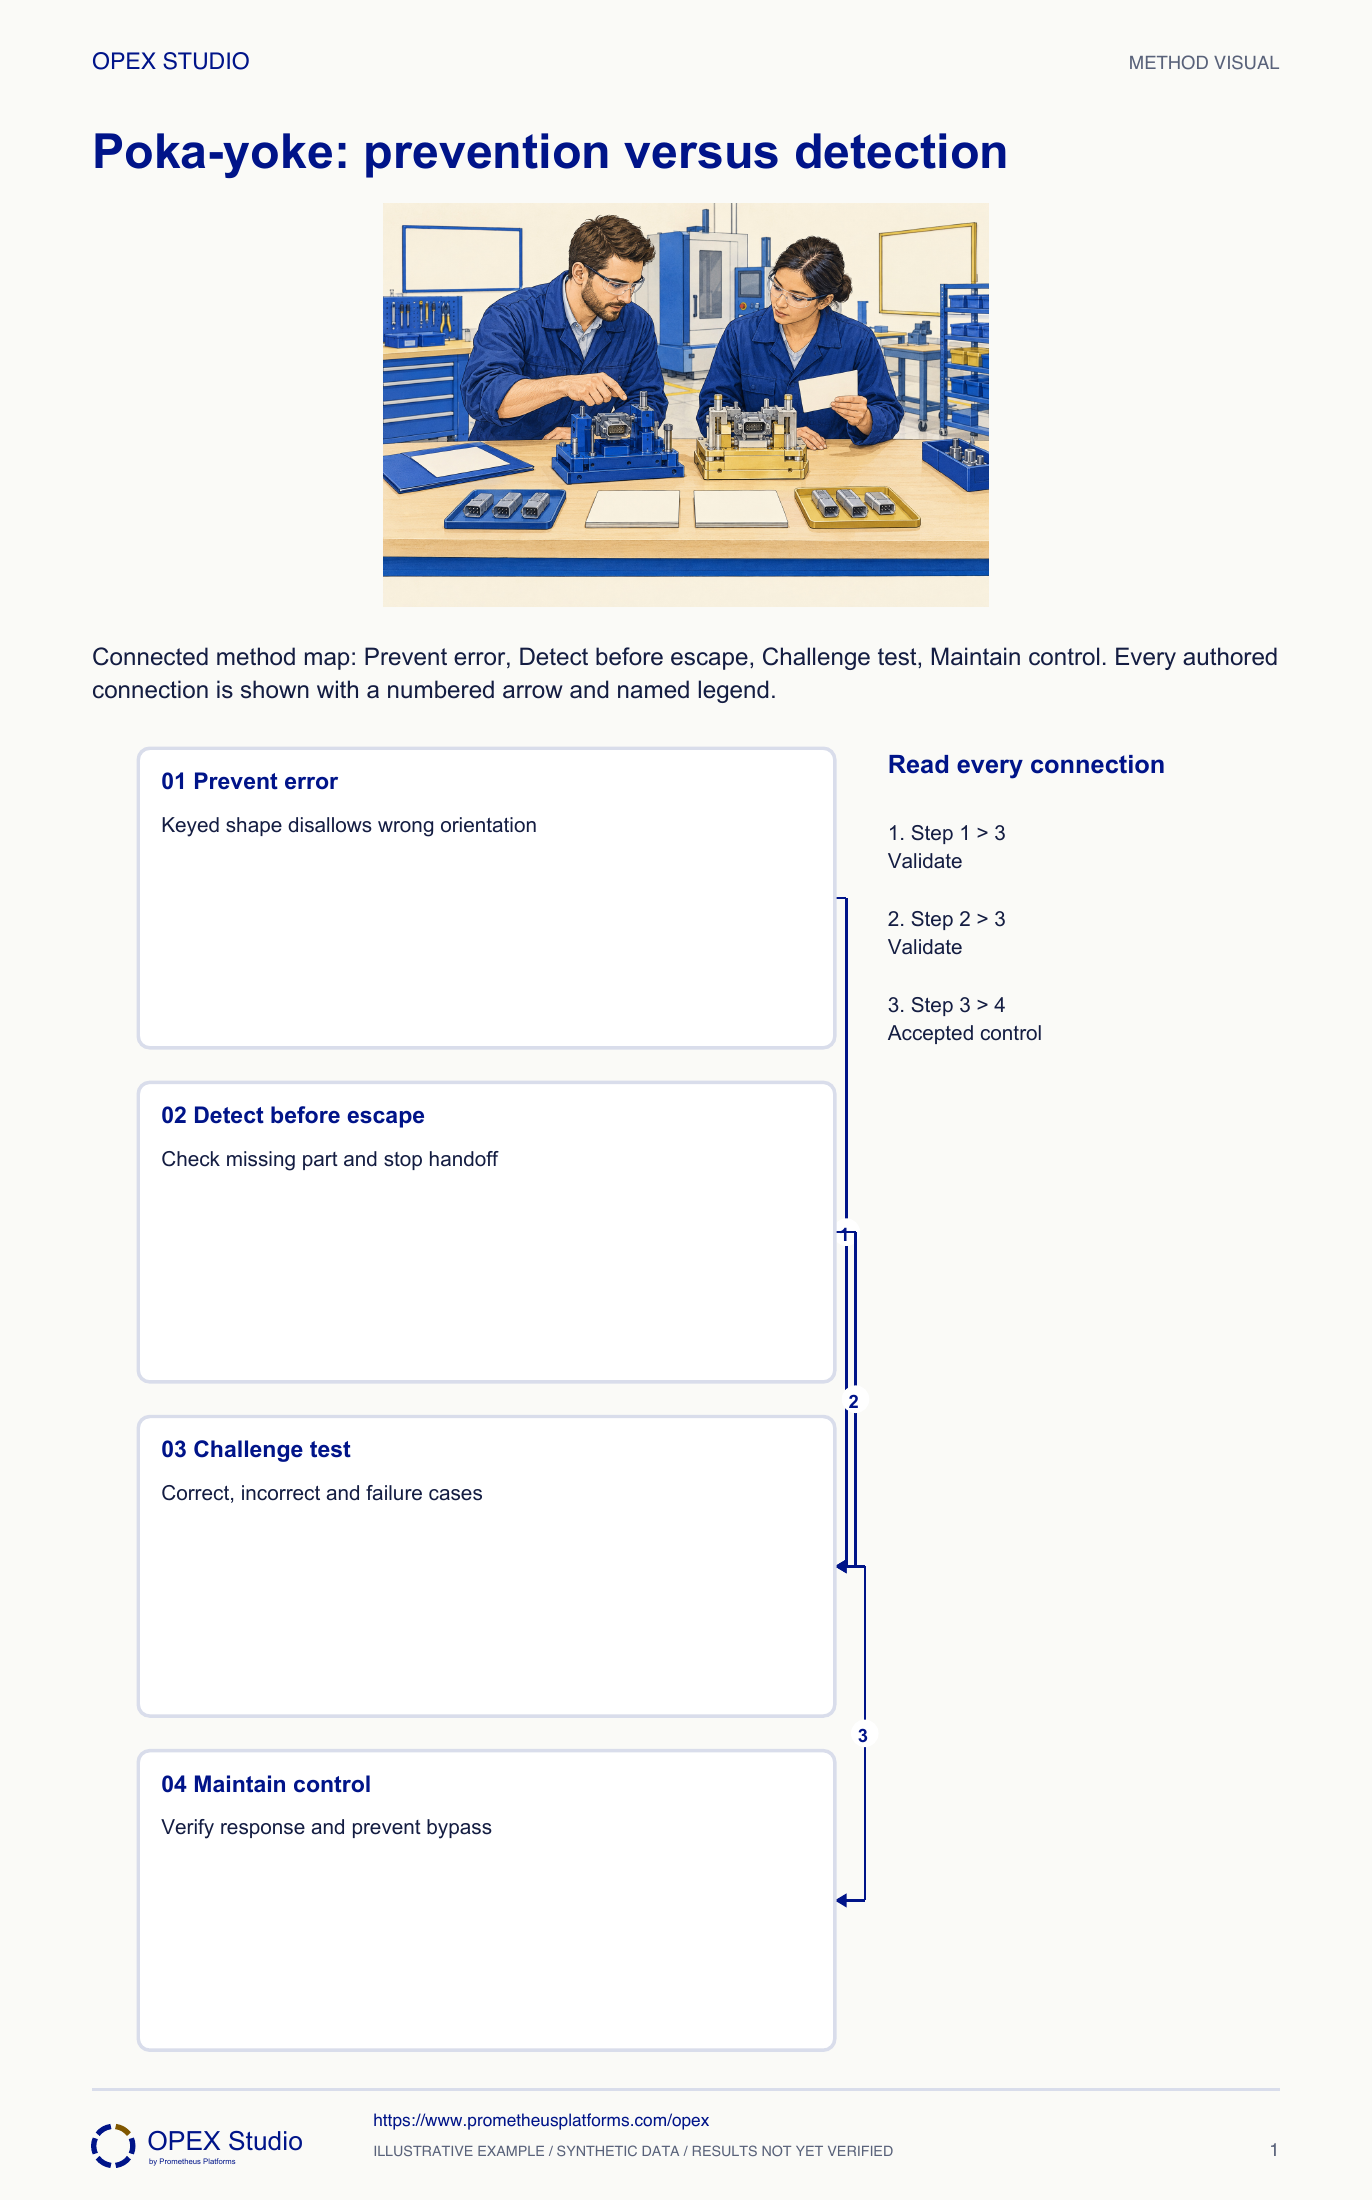
Start with a specific error mechanism rather than a general request to be more careful. A keyed shape can prevent an incorrect orientation; a detection device can identify a missing part before it passes downstream. These are different levels of protection. Challenge the proposed control with known correct and incorrect cases, including plausible failure or bypass conditions. Define what happens when the check fails and who maintains the mechanism. A warning that people can overlook is not equivalent to physical prevention. Preserve required technical approval and verify the effect on quality before making the control part of the standard method.
A reminder is weaker than prevention.
A sensor can fail or be bypassed.
Cause verification chooses target; Jidoka defines detection response.
Fictional connector assembly: the original connector can be inserted backward. Proposal A introduces a keyed geometry that should prevent that orientation. Proposal B uses a sensor to detect a backward insertion and block release. Engineer Sana must compare mechanisms rather than label both “mistake-proof” without testing.
Do not approve the claimed detection control; the owner must correct and revalidate the fault response.
A normal-operation success cannot compensate for a known escape path in the tested fault condition.
Distinguish preventing a defined error from detecting it before escape, and build a challenge-test record that checks both the control and its failure response.
Fictional connector assembly: the original connector can be inserted backward. Proposal A introduces a keyed geometry that should prevent that orientation. Proposal B uses a sensor to detect a backward insertion and block release. Engineer Sana must compare mechanisms rather than label both “mistake-proof” without testing.
Role: Process engineer with operator, quality and design representatives.
The defined wrong orientation cannot reach accepted downstream output under the approved method.
The team has only tested correctly oriented parts and claims the wrong-orientation failure is eliminated.
| Proposal / evidence | Declared mechanism |
|---|---|
| Original connector | Backward insertion physically possible |
| A: keyed geometry | Intended to prevent backward insertion |
| B: sensor and release block | Intended to detect wrong orientation before release |
| Tests completed | Correctly oriented parts only |
| Missing tests | Wrong orientation, absent part, fault/bypass response as applicable |
Sana defines the target as backward orientation of the specified connector at the insertion step. She separates it from missing connector, wrong model and damaged housing.
Why: “Assembly errors” is too broad to support a testable prevention claim. A control may handle one mechanism while leaving others unchanged.
Evidence: Target failure mode and point of occurrence are explicit.
Proposal A is a prevention candidate if the approved geometry truly makes backward insertion impossible without damage or bypass. Proposal B is a detection/control candidate if sensing reliably blocks unsuitable release.
Why: The distinction concerns the mechanism, not which proposal sounds more advanced. Detection can be useful, but it must have a dependable response.
Evidence: A prevents the insertion mechanism; B detects and blocks escape under its validated conditions.
Using approved challenge parts and test conditions, test correct orientation and the defined incorrect orientation. Include credible sensor fault, missing part or bypass scenarios where relevant to the control.
Why: Passing normal parts tests availability, not necessarily protection. Deliberate challenge testing needs controlled conditions and traceable test objects.
Evidence: Test matrix records expected and actual outcome for each defined case.
Check that a failed or uncertain result leads to the required controlled state and named response, rather than a silent pass. Confirm reset/restart behavior through the approved method.
Why: A detector that can fail unnoticed may provide false confidence. An audible warning alone may not prevent escape.
Evidence: Fault/uncertain-state row includes containment, response owner and acceptance decision.
Document the validated failure modes, challenge frequency and change triggers. Recheck after relevant product, fixture, software or maintenance changes.
Why: A successful initial test does not make the control permanent or universal. The operational standard must retain the challenge method and response.
Evidence: Control owner, approved test record and scope limitations accompany release.
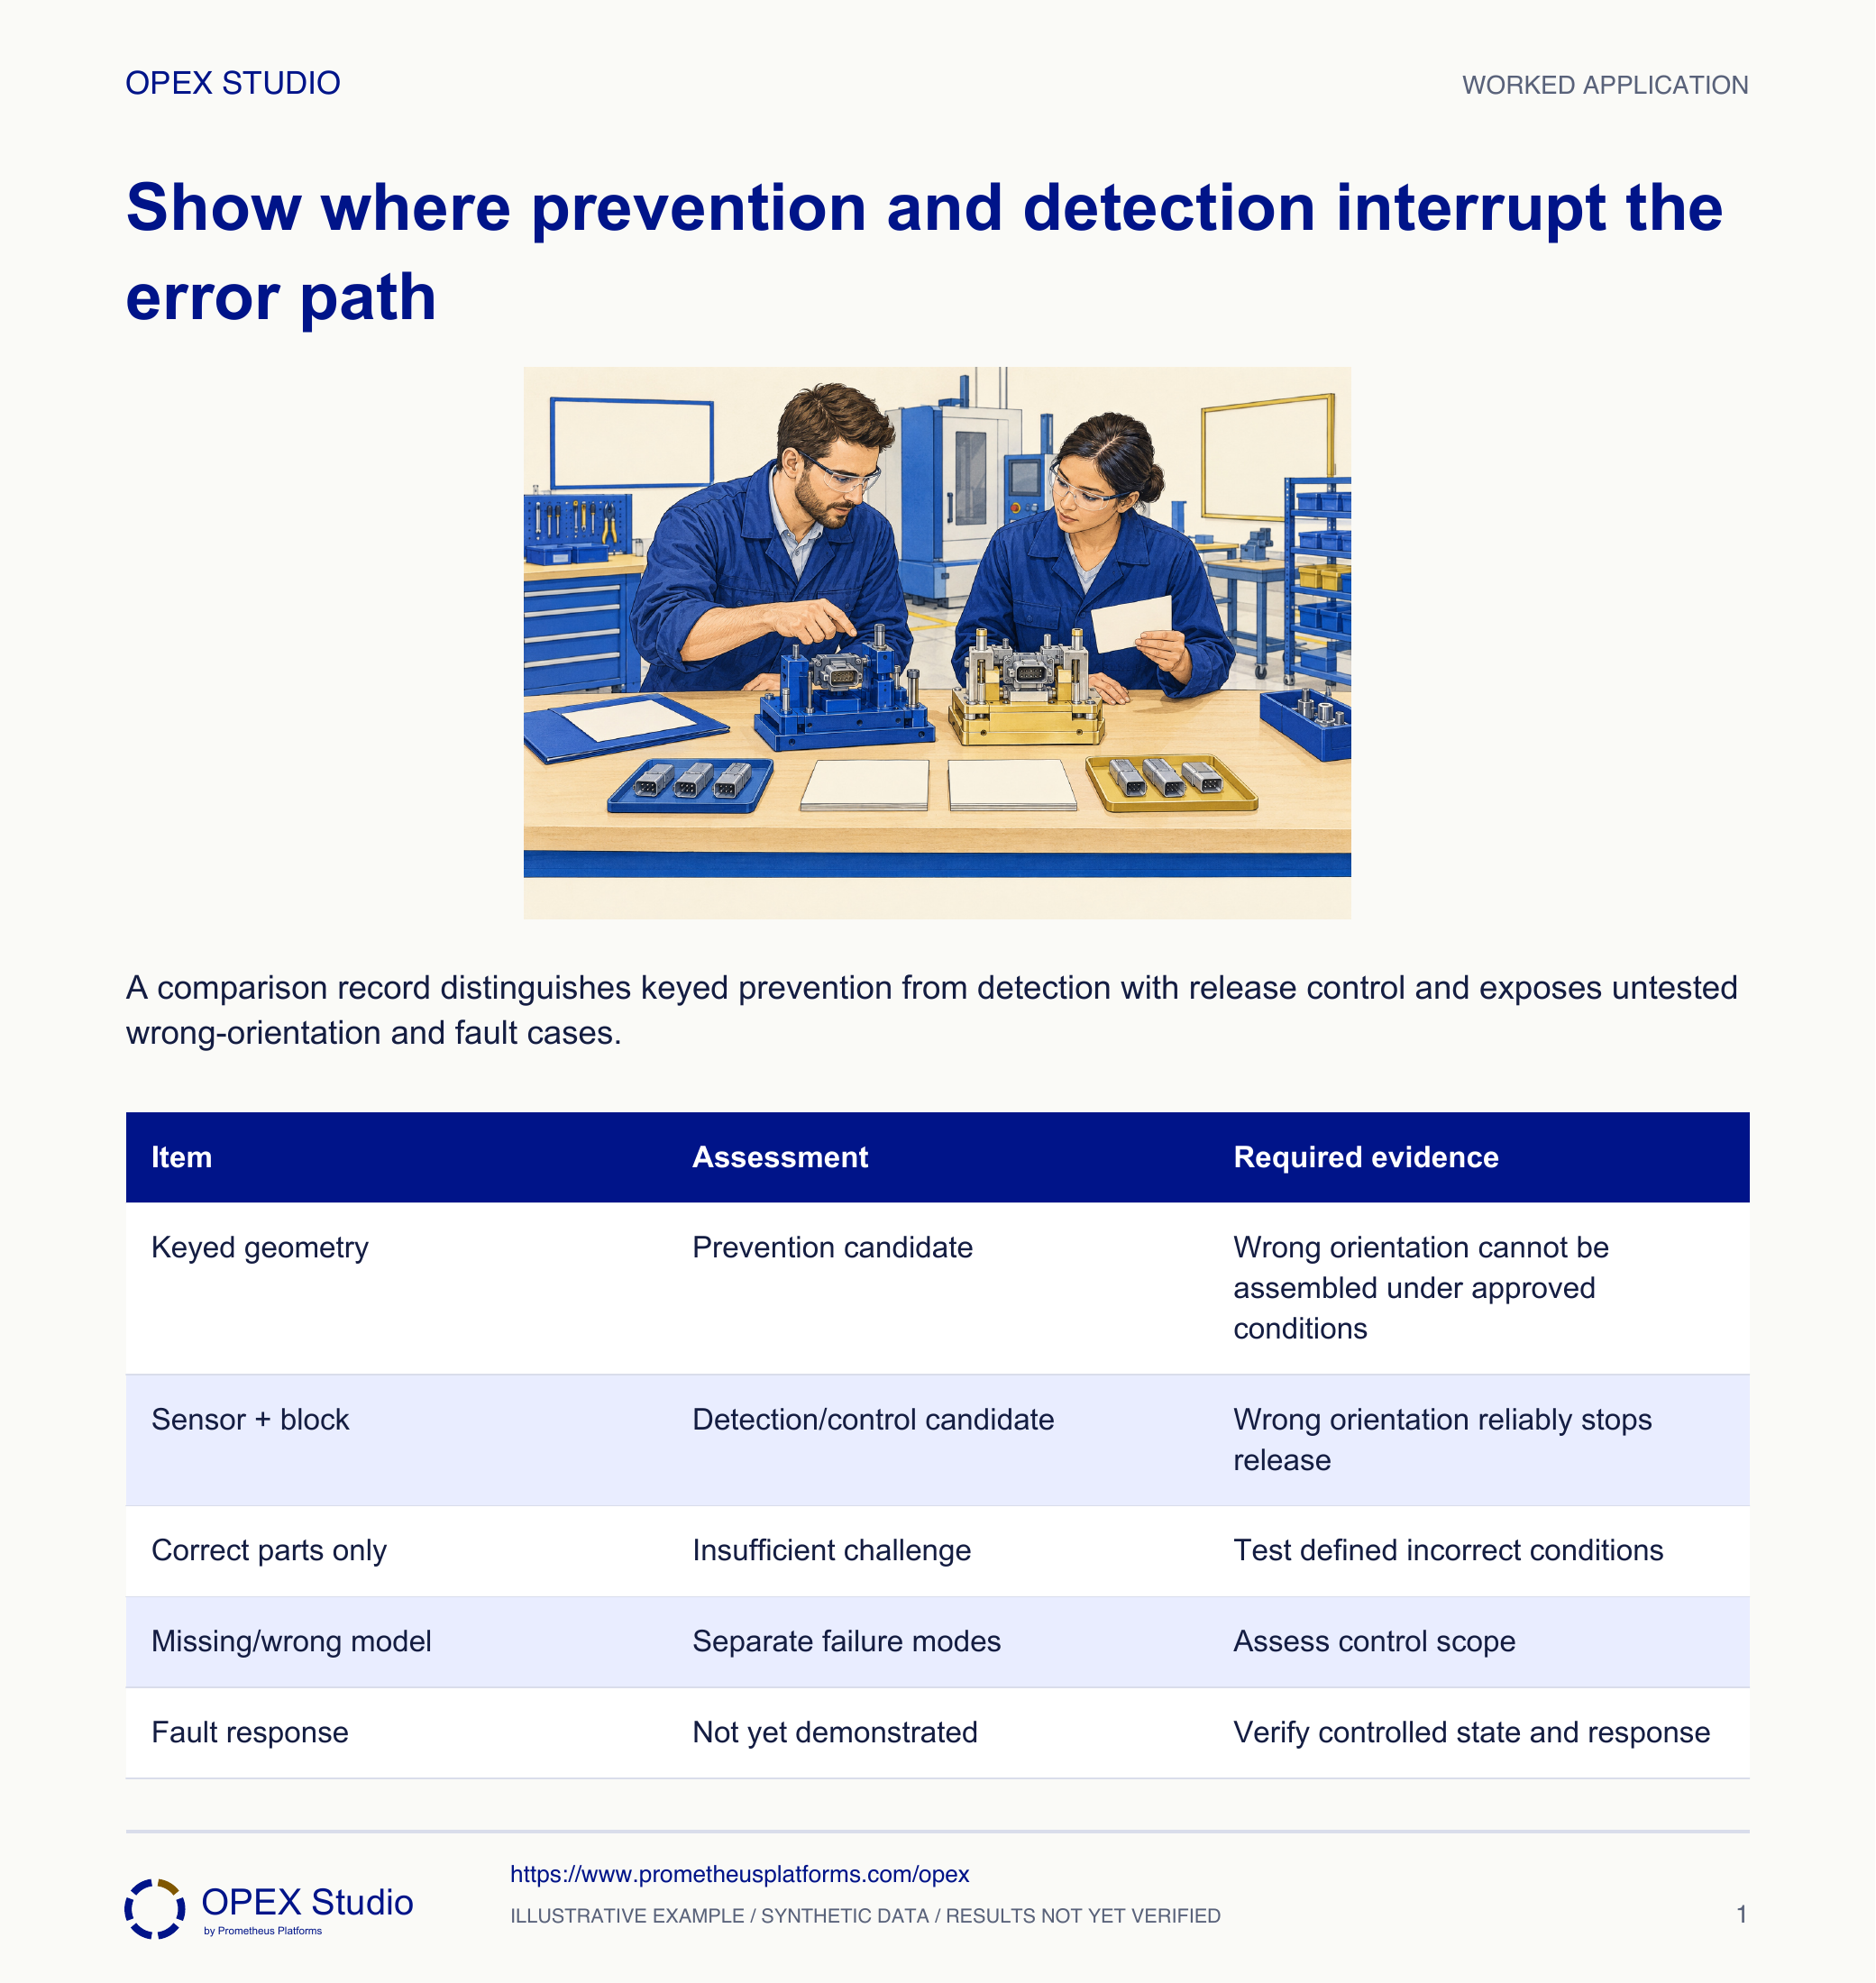
| Item | Assessment | Required evidence |
|---|---|---|
| Keyed geometry | Prevention candidate | Wrong orientation cannot be assembled under approved conditions |
| Sensor + block | Detection/control candidate | Wrong orientation reliably stops release |
| Correct parts only | Insufficient challenge | Test defined incorrect conditions |
| Missing/wrong model | Separate failure modes | Assess control scope |
| Fault response | Not yet demonstrated | Verify controlled state and response |
A fault test shows the sensor has no valid result after power loss, yet the proposed release signal remains permissive.
Do not approve the claimed detection control; the owner must correct and revalidate the fault response.
A normal-operation success cannot compensate for a known escape path in the tested fault condition.
Fault case recorded as failed, with affected claim and required retest.
Separate fictional assembly uses a fixture pocket intended to prevent the next step unless a washer is present. A camera alternative flags a missing washer but only shows a message; downstream release is unaffected.
| Option | Declared behavior |
|---|---|
| Fixture interlock | Intended to prevent next step without washer |
| Camera | Detects absence; warning only |
| Current validation | Present-washer case passed |
The fixture is a prevention/control candidate for proceeding without a washer, but the missing-washer and fault cases remain untested.
The camera detects absence as described; a warning alone does not establish blocked downstream escape.
A valid test record specifies expected behavior for present, absent and applicable fault conditions, using approved controlled test methods.
| Control / evidence | Mechanism | Remaining requirement |
|---|---|---|
| Fixture | Prevent proceeding without washer | Challenge absence and fault |
| Camera | Detect and warn | Escape not proven blocked |
| Normal test | Present washer passed | Does not prove missing-part control |
Which orientation and which connector are in scope?
Where does each proposal interrupt the error path?
What does a warning allow to happen next?
What change would require revalidation?
Draw the error path, mark where the control acts and complete expected outcomes before reading the answer.
Owner: Process/design control owner with quality and operators
Record: Validated challenge matrix, response standard and change-trigger review
Review: At initial approval, defined challenge intervals and relevant changes
Evidence: Correct response to target error and credible faults without unsafe test practices
Retain containment and escalate failed controls; revise and revalidate the claim before relying on it.
Prevent wrong/missing/reversed parts or prevent their passing downstream
Method reference; original OPEX scenario and diagram are synthetic teaching content, not source case results.Read the lessons online or use these PDFs to prepare, practise and review with your team. No sign-in needed.
Case objectives, demonstration plans, debriefs, common mistakes and application checks across all 81 workplace cases and method lessons.
Download Facilitator guide PDF · 166 pages · 65.1 MBPrintable case worksheets, blank observation records and five calculation exercises; answers are separate.
Download Learner workbook PDF · 169 pages · 10.7 MBReasoned sample responses, worked calculations and coaching guidance; fictional examples are clearly labelled.
Download Answer key and coaching notes PDF · 105 pages · 8.5 MBThe native method mechanisms and worked applications for all 68 detailed lessons, in a separate bookmarked portrait reference.
Download Method and application reference PDF · 141 pages · 10.2 MBFive illustrated system chapters: 15 Flare concept maps and 26 original workplace teaching cards, with links to all 81 supporting cases and method lessons.
Download Illustrated systems atlas PDF · 69 pages · 55.8 MBExplore this connected method and its separate application conditions.
Explore the connected method →Explore this connected method and its separate application conditions.
Explore the connected method →Explore this connected method and its separate application conditions.
Explore the connected method →Explore this connected method and its separate application conditions.
Explore the connected method →