Facilitator guide
Case objectives, demonstration plans, debriefs, common mistakes and application checks across all 81 workplace cases and method lessons.
Download Facilitator guide PDF · 166 pages · 65.1 MB OPEXSTUDIO
Part readiness + synchronized flow + yamazumi. Follow the visual, practise a decision, then check your thinking.
Fictional teaching examples and AI-generated illustrations. Proposed changes and goals are not achieved results. Use the written instructions and check local conditions before applying a method.
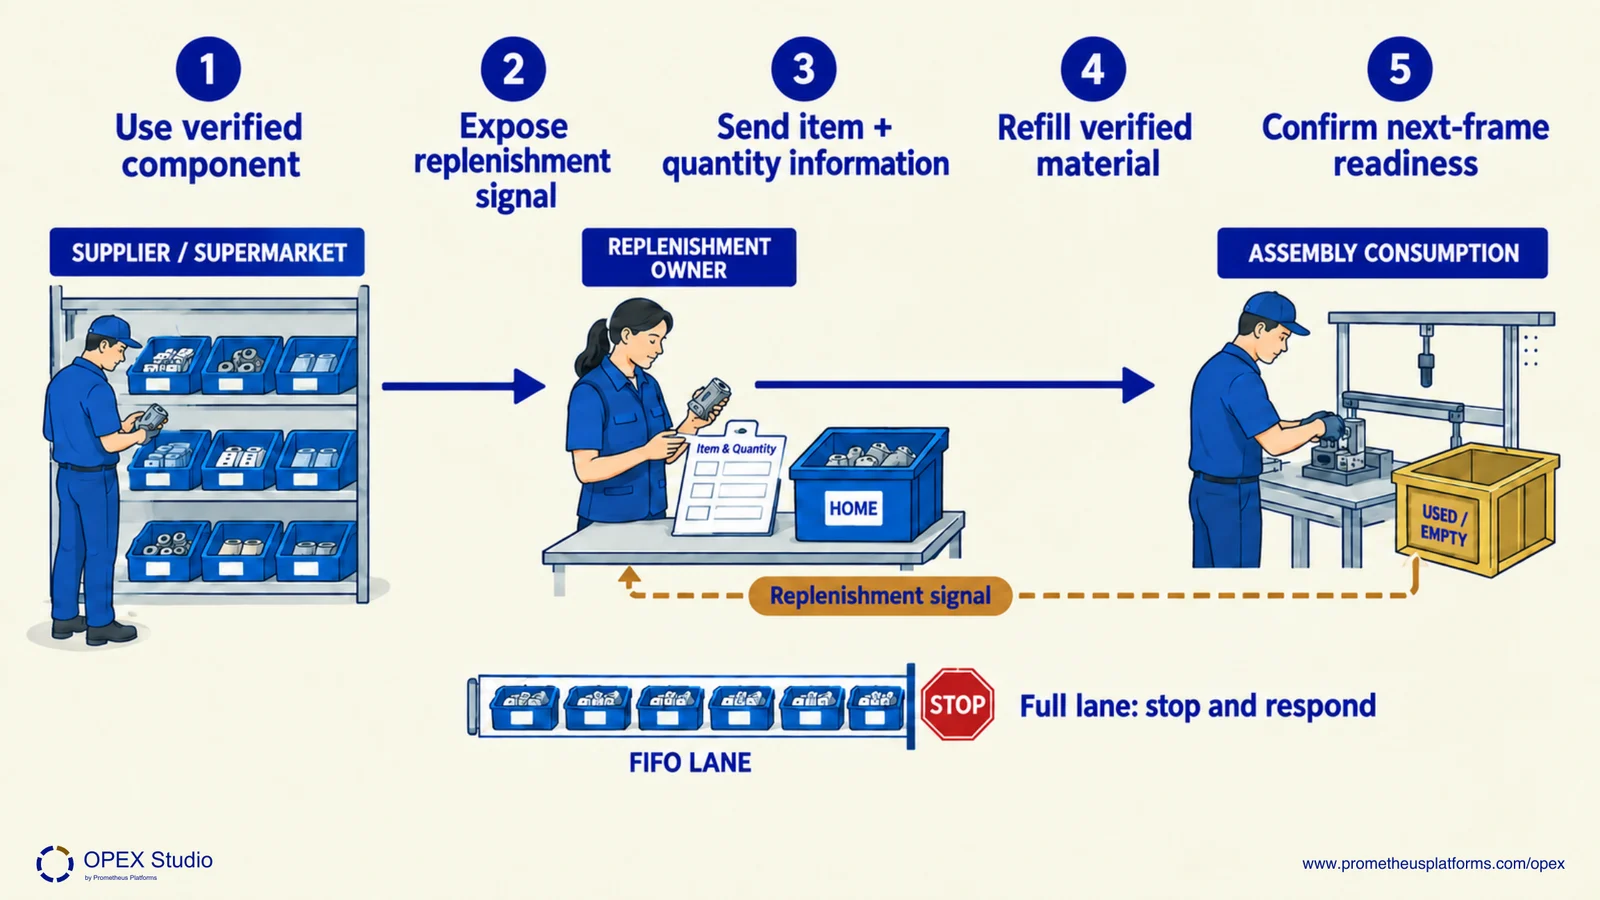
The current case measures component search: twenty observations, 3.4-minute median, 1.5-minute goal. A replenishment loop connects consumption to the right refill and preserves identity. Make the signal, pack quantity, responsible person and full-lane response explicit. Level release to agreed customer demand and mix; do not schedule every upstream point independently. Search-time improvement alone cannot establish synchronized flow or line balance.
Retained component-search sample: 20 observations, median 3.4 minutes; proposed goal 1.5 minutes. It is separate from the new flow and balance exercise.
Material travels toward the using process; replenishment information returns upstream. Preserve part and lot identity and define the finite-lane response.
A refill signal specifies item, quantity and responsible role. Synchronized flow requires an agreed demand and release rule, not independent pushing at every step.
Which arrow carries the request to replenish, and which carries the parts?
Information travels back from consumption; replenished material travels toward the using process.
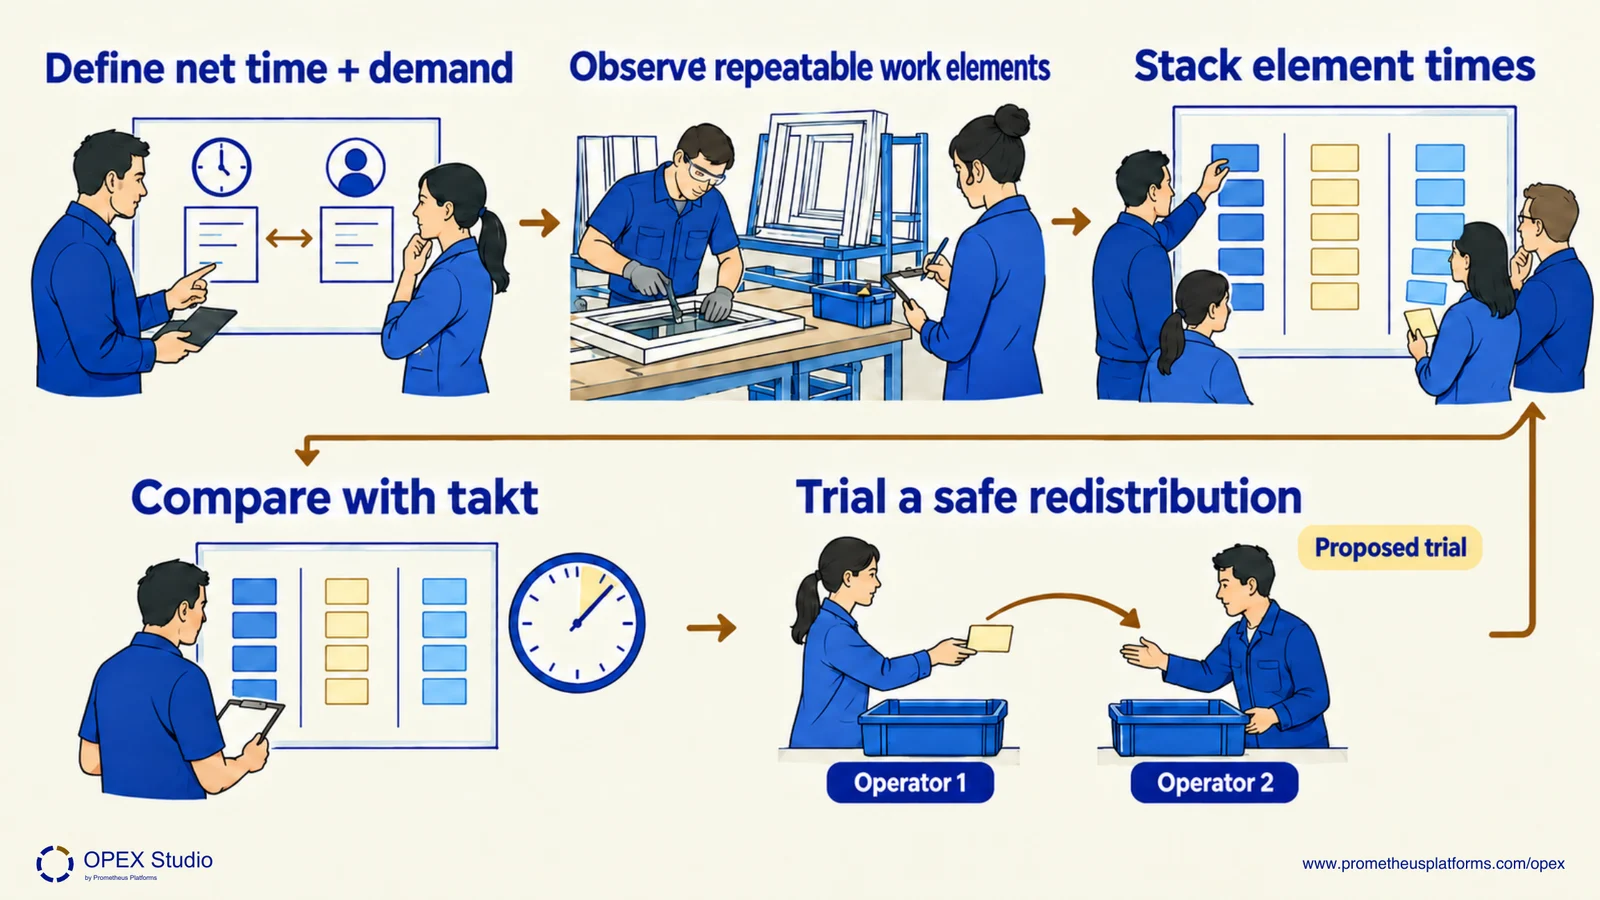
Yamazumi makes work elements and uneven loading visible. This new exercise is separate from the photo case. An 85-second station exceeds the 80-second demand rhythm; equal averages would hide it. Moving one transferable 10-second element gives a theoretical 75/75/60 balance, but precedence, skill, walking, ergonomics, variability and machine time must be checked. A theoretical balance does not demonstrate a stable method. Test the method with the team; do not turn the chart into a headcount target.
New fictional balance exercise: 400 net minutes × 60 / 300 units = 80-second takt. Human work content is 85, 65 and 60 seconds across three operators.
E4, Return empty tote, is a provisionally transferable 10-second element. Moving it from operator 1 to operator 2 gives 75, 75 and 60 seconds; total work remains 210 seconds.
These are human work-content bars, not measured machine cycle times. Actual precedence, walking, competence, ergonomics, quality, variation and machine overlap still need validation.
What remains to be checked after the bars fit below the takt line?
Safe feasible sequence, task transfer, variability, machine overlap, quality and actual end-to-end performance.
Just-in-Time coordinates processes to provide the needed item, timing and quantity. Downstream withdrawal prompts replenishment; minimum necessary parts support the flow.
FIFO preserves arrival sequence through a finite lane. When the lane fills, the supplying process stops adding production until the consuming process releases capacity.
Visual minimum and maximum inventory controls support material management. The proposal’s numerical sizing is an authored training policy, not a universal formula prescribed by this source.
A yamazumi stacks timed work elements by operator against takt to expose uneven loading and explore redistribution. Feasible sequence, skills, ergonomics and machine overlap still require validation.
Takt equals available production time divided by customer demand for the same period. It expresses the demand interval, distinct from measured cycle time and end-to-end lead time.
Heijunka levels production quantity and mix over a chosen period while responding to customer need. Feasible changeovers, process capability and appropriate buffers support smaller repeated sequences.
Downstream need authorizes upstream production or replenishment. Supermarket, sequential and mixed pull serve different conditions; a shelf or card alone does not establish an effective pull rule.
A heijunka box distributes production instructions by product and time interval. Pitch equals takt multiplied by pack-out quantity, linking the release rhythm to a defined amount of work.
Read the lessons online or use these PDFs to prepare, practise and review with your team. No sign-in needed.
Case objectives, demonstration plans, debriefs, common mistakes and application checks across all 81 workplace cases and method lessons.
Download Facilitator guide PDF · 166 pages · 65.1 MBPrintable case worksheets, blank observation records and five calculation exercises; answers are separate.
Download Learner workbook PDF · 169 pages · 10.7 MBReasoned sample responses, worked calculations and coaching guidance; fictional examples are clearly labelled.
Download Answer key and coaching notes PDF · 105 pages · 8.5 MBThe native method mechanisms and worked applications for all 68 detailed lessons, in a separate bookmarked portrait reference.
Download Method and application reference PDF · 141 pages · 10.2 MBFive illustrated system chapters: 15 Flare concept maps and 26 original workplace teaching cards, with links to all 81 supporting cases and method lessons.
Download Illustrated systems atlas PDF · 69 pages · 55.8 MBMin-max makes the refill decision explicit; validate the demand and replenishment assumptions before setting stock levels.
Explore the connected method →FIFO preserves identity and sequence between steps, while approved setup improvement may make smaller releases feasible.
Explore the connected method →